
Guide · Technique
Frame interpolation for AI clips: the whole clip, or just the jump?
Frame interpolation can smooth AI video, but where you apply it matters. Here is the difference between interpolating everything and repairing one spot.
Updated
What frame interpolation does
Frame interpolation computes a new frame between two existing ones. It estimates how each part of the picture moves from frame A to frame C (optical flow) and builds frame B halfway along that motion. Neural methods such as RIFE learn this estimate from training data.
Frame Repair uses RIFE 4.6 and runs it on your Mac's GPU, so the clip never leaves your machine.
Interpolating the whole clip
The common use is raising the frame rate: 24 to 48 or 60 fps for smoother playback, or higher for slow motion. Every pair of frames gets new frames in between.
That makes motion look smoother overall, but it does not change the proportions. Take a clip where each step is 1 unit and one step is 2 units. At 48 fps every step is halved: the normal steps become 0.5 units and the jump becomes 1 unit. It is still twice as long as the steps around it, so the hitch is still there, just at a higher frame rate. Go back to 24 fps afterwards and you are back to the original steps.
A higher frame rate also changes the look. 24 fps footage played at 60 fps reads as smoother, more video-like motion, which you may not want in a film edit.
Interpolating only at the jump
Targeted repair keeps the clip at 24 fps (or 25) and works only where a step is too long. It inserts one computed frame between the two frames around the jump, so the 2-unit step becomes two 1-unit steps, the same as the neighbours. The rest of the clip stays untouched, original frames and all.
The hard part is finding those spots. Frame Repair tracks about 600 points per frame, forward and backward, and marks steps above 1.6 times the typical step. You review each marked spot before export.
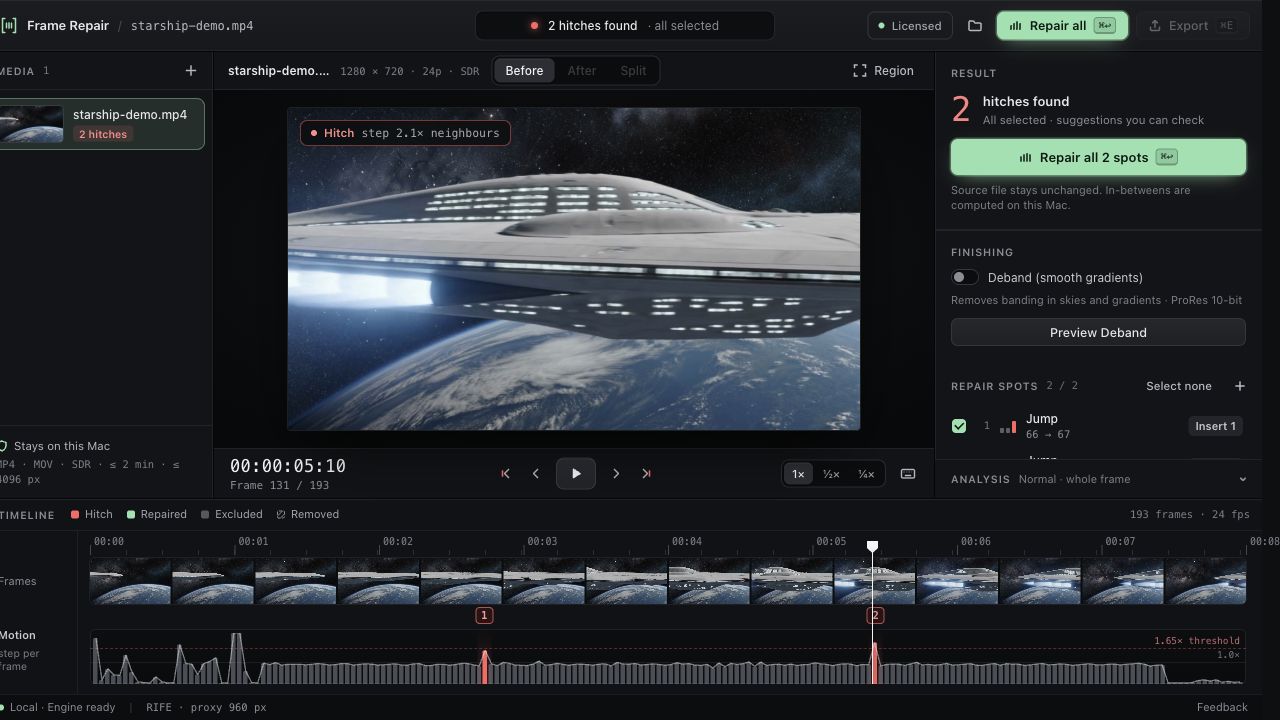
Insert, Replace, Drop
- Insert adds a computed frame at the jump. The motion becomes even; the shot gets one frame longer per repair.
- Replace rebuilds a frozen frame in place. Same length.
- Drop removes a duplicate frame. Slightly shorter.
Insert is the mode for the motion jump. Replace and Drop are there for clips that also contain frozen or duplicate frames.
24 or 25 fps output?
Choose the rate of your timeline. The repair restores the missing in-between motion from the source clip either way. With Insert, the running time grows by one frame per repair (one of our test clips went from 193 to 242 frames after 49 repairs), and you see the new length before you export.
Other ways to interpolate
General-purpose tools can interpolate too, and you may already have one:
- Optical-flow retiming in editors such as DaVinci Resolve or Premiere Pro, applied to a range you choose.
- FFmpeg's
minterpolatefilter, which changes the frame rate of the whole clip. - Dedicated apps such as Topaz Video for frame rate conversion and slow motion.
If you already know where the jump is, retiming that spot in your editor works. What Frame Repair adds is finding the jumps for you and repairing only those, locally on your Mac. Details on the full workflow are in How to fix stuttering AI video.